
Managing mergers and acquisitions or even existing environments has its challenges. There are different systems and subscriptions to gather information from and there’s also endpoints (managed or not ) where a quick inventory would be super useful. Typically I see orgs having to purchase additional licenses to fold these new/old devices into their existing endpoint management solution (e.g. Microsoft Endpoint Manager) or fully replace the existing fleet of endpoints, however both options take time to accomplish.
With the release of Power Automate Desktop we can perform a wide variety of operations, including collecting device inventory. Of course we could run PowerShell scripts on all these devices, however it takes time to design and create scripts, whereas Power Automate Desktop provides a quick and intuative interface to design automation flows including UI flows.
In future builds of Windows, Power Automate Desktop will simply be part of the build so no deployment will be necessary, more details here: New Power Automate Desktop running on Windows – YouTube Regardless, Power Automate Desktop gives organizations the flexability to run automation directly from one or more Windows endpoints.
For this months post we’ll focus on utilizing Power Automate Desktop (PAD) to collect device inventory and saving the inventory files to a file share in Azure using Azure Files. PAD may be run in attended and unattended mode, however this all depends on what licensing is in place. More details on Power Automate licensing may be found here: https://go.microsoft.com/fwlink/?linkid=2085130
Let’s get started!
Requirements
- Power Automate
- Azure subscription
- Windows 10 device
For licensing in Power Automate Desktop please visit: Automate tasks with Power Automate Desktop for Windows 10—no additional cost | Power Automate Blog (microsoft.com)
Note: depending on scenario, additional licensing may be required please see the licensing guide for more info: https://go.microsoft.com/fwlink/?LinkId=2085130&clcid=0x409 and Power Apps and Power Automate licensing FAQs – Power Platform | Microsoft Docs
Download Power Automate Desktop: Power Automate Desktop | Microsoft Power Automate
Creating a storage account in Azure
We’re going to create an Azure storage account to share and store the device inventory files PAD creates. I’m wont go into details about Azure storage accounts or how to create a share, however the instructions are very well written and a secure file share can be set up in less than five minutes. To learn more about Azure Files, please visit: Introduction to Azure Files | Microsoft Docs
After the file share is created we’ll need to connect to it, do this by following the arrows to the “Connect” option in the image below:

Once under “Connect” we see a page similar to the image below. For Windows, select a drive letter, in my case “I:” (for inventory). For authentication, we have two choices, AD or a Key, I chose to use a key, however if AD is set up using AD Domain Services, this is an option as well.
Finally copy the auto generated PowerShell script. Note: the Connect page only displays a partial view of the script, once it’s copied the full script is viewable from notepad as displayed below.
Here is an example of the full script:
$connectTestResult = Test-NetConnection -ComputerName cbopsfiles.file.core.windows.net -Port 445
if ($connectTestResult.TcpTestSucceeded) {
# Save the password so the drive will persist on reboot
cmd.exe /C "cmdkey /add:`"cbopsfiles.file.core.windows.net`" /user:`"Azure\cbopsfiles`" /pass:`"PASSWORD REMOVED`""
# Mount the drive
New-PSDrive -Name I -PSProvider FileSystem -Root "\\cbopsfiles.file.core.windows.net\inventoryfiles" -Persist
} else {
Write-Error -Message "Unable to reach the Azure storage account via port 445. Check to make sure your organization or ISP is not blocking port 445, or use Azure P2S VPN, Azure S2S VPN, or Express Route to tunnel SMB traffic over a different port."
}

Power Automate Desktop
We’ll need to download the Power Automate Desktop client app as well as the gateway. The gateway allows communication with Power Automate for admins to run from a central location.
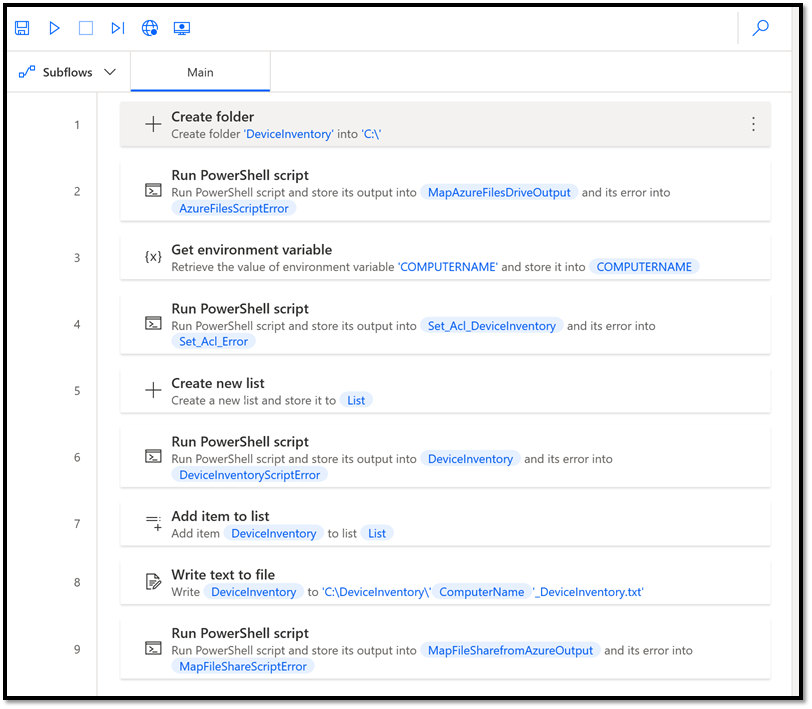
There are nine steps in the PAD flow I created, let’s walk through each one (some I won’t go into detail as they’re self explanitory):
- Step 1 Create folder – we need to create a folder on the device to store the inventory file, in my case I create a unique folder named “DeviceInventory”.
- Step 2 Run PowerShell Script – for this step we’re mapping the share in Azure Files to drive “I:” in fact Azure Files will provide you with a script similar to the one below:
$connectTestResult = Test-NetConnection -ComputerName cbopsfiles.file.core.windows.net -Port 445
if ($connectTestResult.TcpTestSucceeded) {
# Save the password so the drive will persist on reboot
cmd.exe /C "cmdkey /add:`"cbopsfiles.file.core.windows.net`" /user:`"Azure\cbopsfiles`" /pass:`"PASSWORD REMOVED`""
# Mount the drive
New-PSDrive -Name I -PSProvider FileSystem -Root "\\cbopsfiles.file.core.windows.net\inventoryfiles" -Persist
} else {
Write-Error -Message "Unable to reach the Azure storage account via port 445. Check to make sure your organization or ISP is not blocking port 445, or use Azure P2S VPN, Azure S2S VPN, or Express Route to tunnel SMB traffic over a different port."
} - Step 3 Get environment variable – for this step we pull the local environment variable for “COMPUTERNAME” to be utilized in naming the inventory file.
- Step 4 Run PowerShell Script – here we set the security ACL on the folder just to make sure the account has access to the folder.
$acl = Get-Acl -Path 'C:\ DeviceInventory '
$permission = $env:username, 'Write', 'ContainerInherit, ObjectInherit', 'None', 'Allow'
$rule = New-Object -TypeName System.Security.AccessControl.FileSystemAccessRule -ArgumentList $permission
$acl.SetAccessRule($rule)
# Save the access rule to disk:
$acl | Set-Acl -Path 'C:\ DeviceInventory ' - Step 5 Create new list – this is the list we’ll add all the inventory data to.
- Step 6 Run PowerShell Script – run PowerShell script to query WMI to pull inventory items (add or remove items where needed).
write-host username:Get-WmiObject -Class Win32_ComputerSystemGet-WmiObject -Class Win32_ProcessorGet-WmiObject -Class Win32_BIOSGet-WmiObject -Class Win32_operatingsystemGet-WmiObject Win32_logicaldisk | Format-Table Name, {$_.Size/1GB}, {$_.FreeSpace/1GB} -autosize
- Step 7 Add item to list – add inventory data to list.
- Step 8 Write text to file – write the data stored in the list to a text file. Here we utilized the “COMPUTERNAME” variable to append the file name.
- Step 9 Run PowerShell Script – copy the file to the file share in Azure Files
copy-item -Path "c:\DeviceInventory\*" -Destination "I:\Company A merger device inventory" -Recurse

Here’s my file share named “inventoryfiles” where PAD stores device inventory files. So if I run this across multiple Windows devices through PAD, we’ll have multiple files to search over if necessary. We could get more creative and create variables and store individual values in a table, however for quick inventory this should work just fine.

Inventory file
Below is the inventory .txt file output from the PAD flow:

Additional thoughts
Although the process above collected device inventory in a text file and sent it up to an Azure file share, there are many other uses for file copy. In fact Power Automate Desktop could be utilized as a quick backup tool when moving data around or if users are migrating devices or expand the use of PAD by designing UI flows and other operations where automation will free up users to focus on other types of work.
Conclusion
That’s it! We walked through creating a Power Automate Desktop workflow to collect device inventory and send inventory files to a secure file share in Azure.
