

Managing firstline worker devices requires planning and distribution of devices. However, when devices reach their destination or have technical issues requiring factory reset, those same devices will need to be enrolled again.
Some organizations pre-enroll, however this doesn’t solve for onsite factory resets, while other organizations print out barcodes or QR codes for users to scan with a firstline (rugged) device. I’ve seen endpoint admins print out QR codes and distribute them across locations, however if an organization has 100’s of locations and 1000’s of devices, this can be very time consuming and even risky for those security minded individuals.
To enhance the Android enrollment experience with Intune, we can utilze Power Apps and Power Automate to create a portal where any user with permissions may sign in, select the location where their device resides, and scan the associated QR code created in Intune. This also keeps non-admins out of the MEM admin portal if you need to limit access. Otherwise RBAC may be utilized if you’d like to grant individuals access to certain functions of Intune.
Let’s get started!
Requirements
- Microsoft Endpoint Manager – Intune
- Power Apps
- Power Automate
App screenshot

Power Automate
In the flow below I follow a series of steps, much like a couple of my past posts using Power Automate to automate actions using data from Intune.
To get stared, create a new Power Automate flow and follow the steps below.
Step 1 add a the PowerApps trigger which will be called from Power Apps on app load and with a refresh button (more on this later).
Step 2 add the “Current time” action which I’ll use from dynamic content in the Graph query.
Step 3 add HTTP action and add the query displayed in the URI. Select “Show advanced options” to configure Azure AD auth. Note, in the query I do all the filtering and ordering in the query vs in Power Apps so it comes over clean and ready to use.
https://graph.microsoft.com/beta/DeviceManagement/androidDeviceOwnerEnrollmentProfiles?$filter=tokenExpirationDateTime gt @{body('Current_time')}&$select=displayName,enrollmentMode,enrolledDeviceCount,qrCodeContent,qrCodeImage&$OrderBy=displayName
Step 4 add a “Parse JSON” action and copy and past the output from a Graph Explorer query using the query from the HTTP URI field, select “Generate from sample” and paste the Graph query output. Note, we can’t utilize the exact query above as we have to be more specific when using Graph Explorer as shown in the query below.
https://graph.microsoft.com/beta/deviceManagement/androidDeviceOwnerEnrollmentProfiles?$filter=tokenExpirationDateTime%20gt%202020-10-16T21:59:41.121Z%20and%20enrollmentMode%20eq%20%27corporateOwnedDedicatedDevice%27&$select=displayName,enrollmentMode,enrolledDeviceCount,qrCodeImage&$OrderBy=displayName
Step 5 add a “Response” action and copy only the array from the JSON shema:
{

    "type": "array",

    "items": {

        "type": "object",

        "properties": {

            "displayName": {

                "type": "string"

            },

            "enrollmentMode": {

                "type": "string"

            },

            "enrolledDeviceCount": {

                "type": "integer"

            },

            "qrCodeImage": {

                "type": "object",

                "properties": {

                    "value": {

                        "type": "string"

                    }

                }

            }

        }

    }

}
Completed Power Automate flow

Power Apps
I follow a fairly simple design model with Power Apps that can be reviewed in some of my past posts. To get started, create a new Power App and follow the design description below.
I’m going to simplify the Power App walk through for this post, however if you’d like to dig in deeper, please see my previous posts.
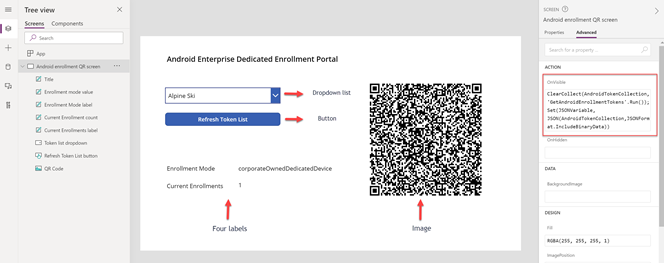
App UI layout and code
Main screen under ACTION > OnVisible add:
ClearCollect(AndroidTokenCollection,{displayName:""});Collect(AndroidTokenCollection,'GetAndroidEnrollmentTokens'.Run());Set(JSONVariable, JSON(AndroidTokenCollection,JSONFormat.IncludeBinaryData))
For the collection I added a blank (AndroidTokenCollection,{displayName:””}) to the table for security purposes as I didn’t want a QR code to show when the Power App was initially launched or refreashed.
Dropdown list: here we just need to add the collection name and since displayName is the first column we don’t need to do anything else:
AndroidTokenCollection
Refresh button: identical to the OnVisible ACTION add the following under ACTION > OnSelect:
ClearCollect(AndroidTokenCollection,{displayName:""});Collect(AndroidTokenCollection,'GetAndroidEnrollmentTokens'.Run());Set(JSONVariable, JSON(AndroidTokenCollection,JSONFormat.IncludeBinaryData))
Enrollment mode data label: under DATA > Text add:
'Token list dropdown'.SelectedText.enrollmentMode
Current enrollments data label: under DATA > Text add:
'Token list dropdown'.SelectedText.enrolledDeviceCount
Image field: for the image (i.e. QR code) I needed to get creative with how to build out the QR code as Graph only returns Base64 for the image, i.e. just a bunch of random text that is the image data. To do this I needed to concatenate to merge the base64 return value and make sure the image field understands it’s actually an image. Do this by adding the following under DATA > Image add:
Concatenate("data:image/jpeg;base64,",'Token list dropdown'.SelectedText.qrCodeImage.value)
Video
Here’s a video of the Power App in action. I blurred out the QR codes because I don’t want everyone enrolling their devices in my tenant ;-).
Conclusion
That was fun! We created a simple Power App where we query Intune through Graph using Power Automate to pull all the Android dedicated enrollment tokens and display the QR code as an image to be scanned by remote workers needing to enroll Android firstline devices.
Appendix
To make sure Android enrollment tokens are always up to date, please review my past post on how to auto-renew Android enrollment tokens with Power Automate: Automatically renew Android enrollment tokens using Power Automate – Mobility, Management, & Security (uem4all.com)
