Notifications are critical for organizations especially if a notification needs to be sent in bulk to users. Whether it’s an emergency, warning, or general info, notifications are useful in many scenarios. There are several methods to send a notification to users with devices where the Intune app/Company Portal are available, either through the MEM admin center UI or using Microsoft Graph. MEM Admin center supports sending notification to multiple devices in bulk directly from the UI. However, tasks such as sending notifications often times falls on IT to deliver and with all the other priorities, sometimes tasks such as sending notifications may be better suited for other teams to handle. Fortunately notifications can be streamlined by offloading the notification tasks to non-admins such as HR, field safety teams, or emergency response teams through Power Apps and Power Automate.
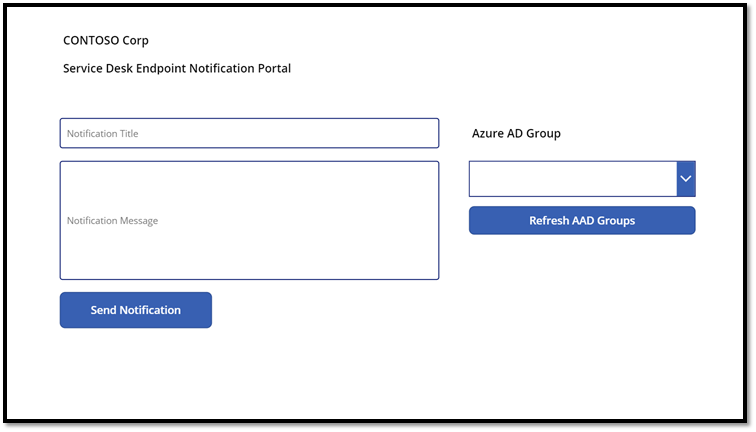
This post walks through creating a custom notification app utilizing Power Apps, Power Automate, and Microsoft Graph. The user will enter a notification title, create the message, and select the group to send it to.

Requirements
- MEM Intune
- Power Automate
- Power Apps
- Microsoft Graph
Let’s get started
If you’d like to test before jumping in, try sending a nonfiction from Graph by visiting: Graph Explorer – Microsoft Graph

I have two Power Automate flows created for this app, one to query for Azure AD groups and another to send the notification.
Query Azure AD Groups Power Automate flow
For the purposes of this app, I only care about the name and ID attributes returned from the Graph call. The group name we’ll utilize to show a list of names in a dropdown and the group ID is utilized to target which group to send the notification to, all other JSON isn’t needed (unless you’d like to show more details).
More details on listing groups through Graph: List groups – Microsoft Graph v1.0 | Microsoft Docs, Note: the limit is 950 groups returned from a Graph call.
In Power Automate (PA), create a new PA flow and begin by adding the PowerApps trigger, HTTP, Parse JSON, Response, actions.
For the HTTP action add the following Graph call and fill out the authentication section by selecting “Show advanced options”: https://graph.microsoft.com/v1.0/groups?$top=950&$select=id,displayName&$orderby=displayName
Under Parse JSON action, run the query using Graph Explorer and copy the JSON output and past by selecting Generate from sample and adding it there.
In the Response action add the following to the “Response Body JSON Schema” (don’t generate from sample). We only want to array which is a subset of what the JSON output is.
{
“type”: “array”,
“items”: {
“type”: “object”,
“properties”: {
“id”: {
“type”: “string”
},
“displayName”: {
“type”: “string”
}
}
}
}
AAD Group PA flow:

Send notification Power Automate flow
Create another PA flow and start by adding the PowerApps trigger.
Next add three variables, GroupID,Title,NotitificationM which are the fields required to populate the Graph request body, more on this later.
For more details, here’s the reference to the notification Graph API: sendCustomNotificationToCompanyPortal action – Microsoft Graph beta | Microsoft Docs
Note: the endpoint is currently in beta
Add three variables, name them, choose String for type, we’ll add the Value after we generate the Power App.
For the HTTP action, populate the URI with: https://graph.microsoft.com/beta/deviceManagement/sendCustomNotificationToCompanyPortal
And add the following to the Body section:
{
“notificationTitle”: “Populate with the variables created from dynamic content“,
“notificationBody”: “ Populate with the variables created from dynamic content “,
“groupsToNotify”: [
“ Populate with the variables created from dynamic content “
]
}
Notification PA flow:

Power Apps
Let’s move on to create an app in Power Apps.

App breakdown
The Power App is a fairly simple app with just a few fields and a couple buttons as outlined below:

Dev environment

When the app is launched it creates a collection of AAD groups (up to 950 as that’s the limit so you may want to filter your query if there are more than 950 AAD groups in your tenant). For the main screen (mine is renamed to “Contoso Notification Screen) select “Action” from the menu bar and then select “Power Automate” and choose the AAD PA flow created earlier.
Next under ACTION > OnVisible for the main screen add the following code:
ClearCollect(AADGroupCollection, THE NAME OF THE POWER AUTOMATE AAD GROUP FLOW); Set(JSONVariable, JSON(AADGroupCollection, JSONFormat.IncludeBinaryData))
The code above clears the existing collection (if there is one) then creates a new collection named “AADGroupCollection, referring to the Power Automate flow created earlier using Graph to query all AAD groups. The “Refresh AAD Groups” button calls the same JSON above add the code under ACTION > OnSelect for the button.
For the AAD Group dropdown object under DATA > Items add AADGroupCollection. This will populate the dropdown with all the group names from the collection.
Finally for the “Send Notification” button we need to create variables so we can send them back for use in Power Automate. Under ACTION > On Select add the following code:
Set(GroupID,AADGroupDropdown.Selected.id);Set(Title,Subject.Text);Set(NotificationM,Message.Text);(IIntunemobilenotifications.Run(GroupID,Title,NotificationM))
See image below for a breakdown of the code:

After adding the code, go back and populate the variables in the Notifications Power Automate flow.
Note: One thing to keep in mind, anytime a change is made in a Power Automate flow it’s helpful to delete and re-add Power Automate flow in your Power App, this essentially refreshes the connection and updates it so it can see the items in the flow. Do this by selecting the Data connect in the Power App, find the Power Automate flow, delete, then re-add it by selecting ACTION > Power Automate from the menu bar. Depending on what object is selected, you may have to re-add the code, e.g. on visible code.
Lastly make any finishing touches such as arranging fields in the app, renaming default field names, etc.
Demo video
Direct link: https://www.screencast.com/t/hAftb9Z5Waku
Conclusion
That’s it, we’ve created an app to send notifications to users by utilizing Power Apps, Power Automate, and Microsoft Graph.
